
How to Screenshot on Chromebook: A Step-by-Step Guide
Chromebooks are great in capturing or recording full or partial screen. Read more to learn how to Screenshot on Chromebook.
Chromebooks are one of the most popular laptops on the market today. They are simple to use, have long battery life, and have plenty of features. One of the best features of Chromebook is the screenshot feature. Now that you know how to screenshot on a Chromebook, it’s time to learn to capture the entire screen and save it as a picture or graphic. In this blog, we’ll explore different ways to screenshot on a Chromebook, show you how to delete screenshots taken on a Chromebook, and provide some helpful prerequisites before you start screenshotting on a Chromebook. So read on to find out how toto Screenshot on Chromebook!
How to screenshot on a Chromebook using the mouse
Like most people, you probably take screenshots of your computer screens quite often. But what if you don’t have a keyboard or mouse? That’s where screenshots come in! As the name suggests, this Chrome extension allows users to screenshot their screen using the mouse.
- First, make sure your Chromebook is turned on and open.
- Next, click on the “Chromebook Capture” menu option located in the lower-right corner of the screen (or use the keyboard shortcut: Cmd + Shift + S).
- Then press the “Screenshots” button in the window’s lower-right corner (or use the keyboard shortcut: Ctrl+Shift+S).
- Finally, select which area of your screen you want to capture by clicking and dragging it around with your cursor.
- When everything is screenshotted correctly, press ESC to exit out of Screenshots and save all captured files automatically inside your Downloads folder.
How to screenshot on a Chromebook using keyboard shortcuts
Chromebooks are perfect for on-the-go use, but they can be tricky to screenshot. If you’re having trouble getting the screenshot you want, here are some keyboard shortcuts that will help.
- First, if you want screenshot something specific, use your crucial mouse pointer to select what you want to screenshot and hit Command+Shift+4 for a quick snapshot.
- Alternatively, you can press the command + shift + 3 shortcut to capture everything on screen as a photo.
- If using a Chromebook is not an option or if capturing screenshots with keyboard shortcuts is too time-consuming, there’s no harm in trying software like Screenshot Captor or Snipping Tool from the Google Chrome Web won’t.
They both offer simple user interfaces and allow users to capture screenshots without any fuss.
How To Take A Full-Screen Screenshot
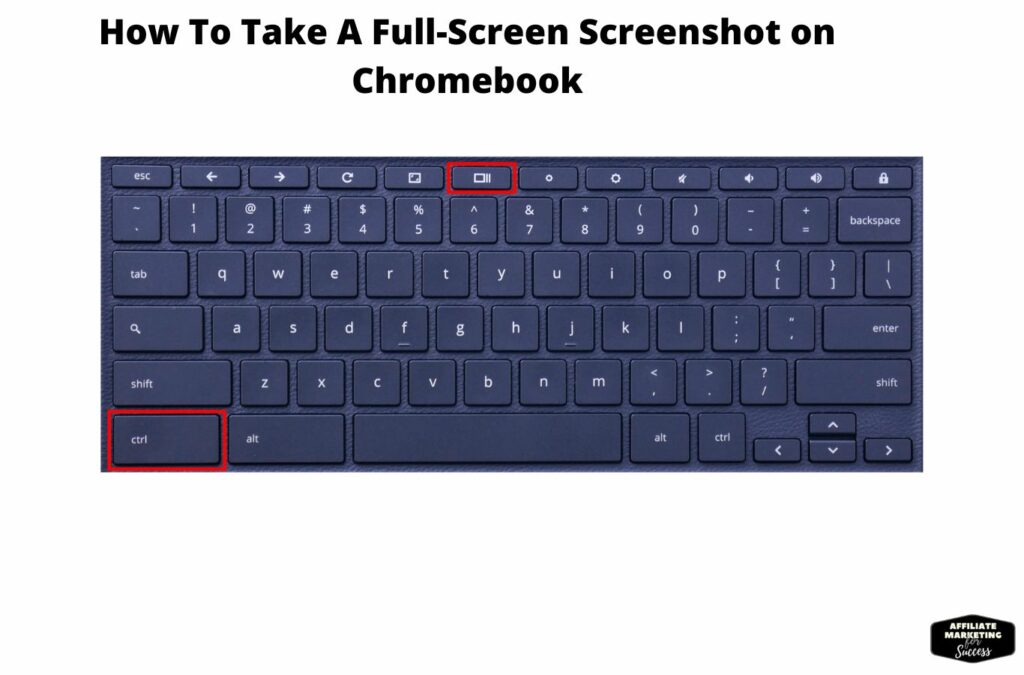
You may occasionally need to capture your whole screen screenshot.
- Simultaneously press Ctrl + Show Windows.
- After that, you’ll get a message indicating that you’ve successfully captured a screenshot on a Chromebook.
How to take a screenshot of a partial screen

If you want to screenshot a part of the screen at other times, do the following:
- Press Shift + Ctrl + Show windows to grab a portion of your screen.
- Your cursor will then shift to a crosshair as a result of this.
- Drag it around until you capture the region you want to capture.
- On Chromebook, a notification confirms that you’ve taken a partial screenshot when you press the mouse button.
How to delete screenshots taken on a Chromebook
Chromebook users can take screenshots easily by following these steps:
- First, click the “Screenshots” option in the menu.
- Second, to screenshot a Chromebook, press and hold the “Ctrl” key and the “Alt” key simultaneously.
- Third, select what you want to capture (a window, web page, or entire screen), then release both keys. You’re done!
How to share a screenshot on Chromebook
To take a screenshot on a Chromebook, first press and hold down the “Command” (or “Ctrl”) key and hit “Shift” + “PrtScn.”
How to print a screenshot on Chromebook
To screenshot on a Chromebook, first open the app you want to screenshot, such as Google Docs or YouTube. Then press Alt+Print Screen.
How to share a screenshot on Google Drive on a Chromebook.
1. Open Google Drive on your Chromebook.
2. Click the three lines in the top left corner of the window.
3. Click More options in the menu that pops up.
4. Under Screenshot Options, click Share to open the sharing dialog box.
5. Use the drop-down menu to select a type of share: Email, Twitter, Facebook, or Google+ (plus).
6. In the text field below, paste the link to where you want people to see your screenshot, and then hit Enter.
How to use the Screen Recording feature on Chromebook
Chromebooks have a built-in screen recording feature that can be used to capture your screen activity.
- To start screen recording, open the Chrome browser and click on the three lines in the window’s top right corner (looks like a gear icon).
- Now, click on “Settings” from the menu bar at the top of the screen and select “Control Options.”
- In the Control Options window, scroll down to the “Screen Recording” section and check the box next to “Enable Screen Recording.”
- Finally, press “Ctrl + Shift + S” to start
Prerequisites

Chromebooks have a built-in screenshot function that can be tricky to use. However, with the help of this guide, you’ll be able to capture anything on your screen-text and images alike!
You’ll first need to determine what you want to screenshot. For example, the Chromebook’s screenshot function will cover you if you’re trying to take a picture of an article for later reference or want to keep a note.
Everything is easy and quick; no fussing around is required! However, capturing all the information you need in one shot can be more challenging. Different methods come in handy: keyboard shortcuts and Chrome OS’ built-in screenshot feature. By following these steps carefully and using the right tool for the job (depending on what you’re trying to capture), taking screenshots will become more accessible than ever!
Conclusion

Taking screenshots on a Chromebook can be a great way to capture essential documents or screenshots for use in future projects. This blog has outlined different methods for screenshotting on Chromebooks using mouse and keyboard shortcuts. Finally, we have provided instructions on how to delete screenshots taken on your Chromebook. Make sure to follow the guidelines to capture the perfect screenshot every time!
Frequently Asked Questions
What are the different tips for taking a screenshot on my Chromebook?
To capture a screenshot on your Chromebook, follow these steps:
1. Open a new tab or window and paste the image URL into it.
2. Hit Enter to share the screenshot with others.
3. You can also use Chrome’s built-in screenshot tool by pressing “Ctrl + Shift + 3”.
4. To take a screenshot of your Chromebook, first press and hold the keyboard’s “fn” button and then hit the space bar.
Is there any way to share screenshots with others without sharing the original file?
You can easily screenshot on a Chromebook using the keyboard shortcut CTRL + SHIFT + 3.
Is it possible to password-protect my screenshots?
Yes, it is possible to password-protect your screenshots on a Chromebook. To do this, follow these simple steps:
1. Click on the three lines in the top left corner of your screen, which will open up settings.
2. Launch the Chrome browser and sign in.
3. Under “chrome://screenshots/,” hit “Take Screenshot.”
4. You can easily password-protect a screenshot by following these simple steps: In the new window that pops up, enter your password and click ‘OK’ to save the screenshot. – Yes, it is possible to password-protect your screenshots on a Chromebook.
What should I do if I accidentally take a screenshot of someone else’s confidential information?
If you’ve accidentally taken a screenshot of someone’s confidential information and don’t have a copy, your best bet is to delete it as soon as possible. In most cases, taking screenshots on a Chromebook is not illegal unless the person being screenshot has given you explicit consent to take a picture. However, if you’re still unsure whether it was legal to take the screenshot, then feel free to reach out to your local law enforcement agency.
How do I screenshot on my Chromebook?
The best way to screenshot on a Chromebook is by using the keyboard shortcut: Command+Shift+3 (Windows) or Command+Shift+4 (Mac). This shortcut will capture the entire screen or selected screen area. Another way to screenshot a Chromebook is to click and drag to choose Rectangle | Ellipse | Window.
Samsung Galaxy Chromebook 2
Awarded Best Chromebook
- THE POWER & SPEED YOU DESERVE
- SLEEK DESIGN TO MAKE YOU STAND OUT
- A BATTERY THAT’S ABOVE & BEYOND
- WHEN INSPIRATION STRIKES, you’re prepared.
I’m Alexios Papaioannou, an experienced affiliate marketer and content creator. With a decade of expertise, I excel in crafting engaging blog posts to boost your brand. My love for running fuels my creativity. Let’s create exceptional content together!